

Creating a great looking stream shouldn’t require a high end gaming PC or capture card. With Mixer’s Lightstream integration, you can do all the things that pro streamers do to increase audience engagement like add text, branded overlays, and alerts. Lightstream works with any FTL enabled stream to Mixer and is ideal for Xbox streamers who want to add more polish to their stream. The beauty of this integration is that you can go as simple or as complex as you want – and once it’s all setup, you don’t need to open Lightstream for it to work.
Turn on the Integration
Mixer Partners and Pros will have access to the Lightstream Integration beta. To start, head over to Mixer.com and turn on the integration in the “Manage Channel” section of your account. Make sure click to “Save” after flipping the switch or it won’t take effect. When the integration is turned on, anything broadcast to your Mixer channel will route through Lightstream. From there, enter Lightstream Studio and authorize your Mixer account.
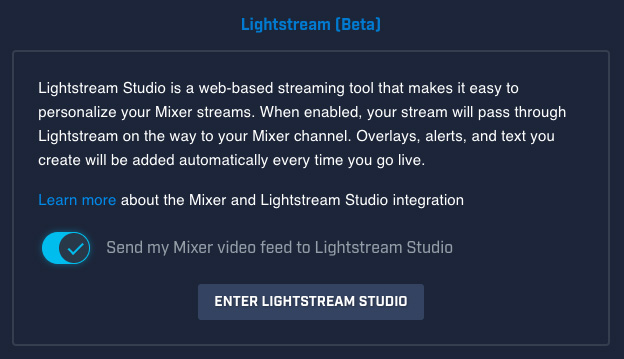
- Turn on the integration in the Manage Channel section of your Mixer account. Make sure to click the Save button!
- Click Enter Lightstream Studio (or go to mixer.golightstream.com)
- Authorize your Mixer account.
Using Lightstream
Mixer Project
Logging in at mixer.golightstream.com will create a single unique Mixer Project for your account. If you’re familiar with Lightstream already, then it’s worth noting that your Mixer Project is special and behaves a bit different than our standard Studio projects.
It automatically starts whenever it receives your Mixer feed, so there’s no manual start/stop button, it only streams to Mixer, and there’s no early access layer types from Lightstream Labs.
Lightstream Interface
If you’re not familiar with Lightstream, let’s do a quick rundown on the interface.
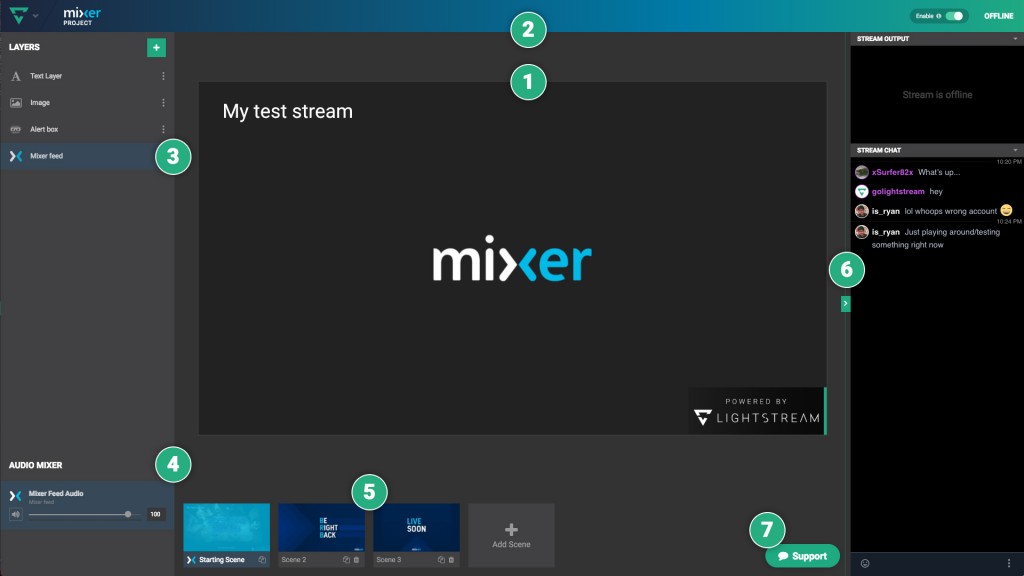
- This is the canvas – which is a preview of what you’re sending out to your stream. By default, we’ve added your Mixer Feed, which will be whatever you’re streaming to your Mixer channel from your Xbox or computer.
- The top bar will tell you if our integration is enabled as well as if you’re live or offline. The dropdown menu in the upper left lets you get back to your other Lightstream projects or log out.
- The left panel contains all the layers you can add to personalize your stream. Hit the green + button to add some. Most of the options are self explanatory – text, images, image slideshows – for example adding a rotating list of sponsors, camera, microphone, and then there are 3rd party integrations. 3rd Party integrations allow you to add dynamic alerts on your stream that are triggered when someone follows, subscribes, and more. Once added, they appear in a list in this Layers panel. If you’re familiar with Photoshop then you’ll understand the layer system pretty quickly. The upper most layer is above everything else while the lowest layer is on the bottom.
- The lower portion of the left panel contains all of your audio. If you were to place a microphone or something from your media layers, it would appear here.
- Down on the bottom, you have all of your different scenes. You can create a “BRB” screen, Starting Soon, and so forth. Just click a scene to change it on your broadcast.
- If you expand the panel to the right, you’ll find a live preview of what’s being sent to your channel as well as your Mixer chat. This panel automatically expands when you go live.
- Last but certainly not least – got a question? Need help? Head on over to our live chat support and hit us up.
Branding and personalizing your streams is easier than ever – especially for native Xbox and Windows 10 streamers without a capture card. We look forward to seeing what you create with the Mixer + Lightstream Integration. As always, if you have questions, please hit us up in the live chat or on our Discord server.